Track Admin menu links are displayed at the menu bar. The disabled folder tabs, menus, and/or options are grayed-out.
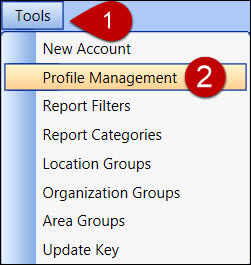
Hover a mouse pointer over the Track Admin menu link, such as View or Tools, to display a drop-down menu.
Click the menu option to select and display the selected menu option's screen.
View
Accounts: Display the login IDs and related information.
Account History: View various reports. Refer to Account History Report Overview for more information.
Tools
New Account: Create a regular, enterprise administrator, site administrator, or support account.
Profile Management: Create, copy, edit, or delete profile rules.
Report Filters: Create or delete a report filter. Add or remove reports to or from a report filter.
Report Categories: Create or delete a report category. Add or remove reports to or from a report category.
Location Groups: Create or delete a location group. Add or remove locations to or from a location group.
Organization Groups: Create or delete an organization group. Add or remove organizations to or from an organization group.
Area Groups: Create or delete an area group. Add or remove areas to or from an area group.
Update Key: Enter the update key received from Management Controls, Inc.
Directories: Single Sign-On feature setup.

From the Accounts screen, right-click the mouse on the login ID line item to open the pop-up menu.
Click the menu option to perform the selected menu option's function or display the menu option's screen.
For Tablet user, press and hold your finger on the line item away from the texts to highlight the line item and open the pop-up menu.
Slide your finger over any of the menu options to freeze the pop-up menu.
Lift your finger then tap the menu option to open the menu option's dialog box.
Delete: Delete a login ID and its information.
Change Password: Reset a password.
Lock/Unlock: Lock or unlock a user account. The locked account is displayed in red. The unlocked account is displayed in black.
Properties: View and edit the selected user's account information.